Laser Defense : 02-earth-visuals
This is the second part of the guide - we will make our sphere look like real earth with atmosphere, post processing ✨ and as a bonus - country lines 🗺️ .
This part is a little long and contains a lot of code - mainly about Shaders. It is less important for most people, so I recommend mimicing some online implementation if you don’t care about it.
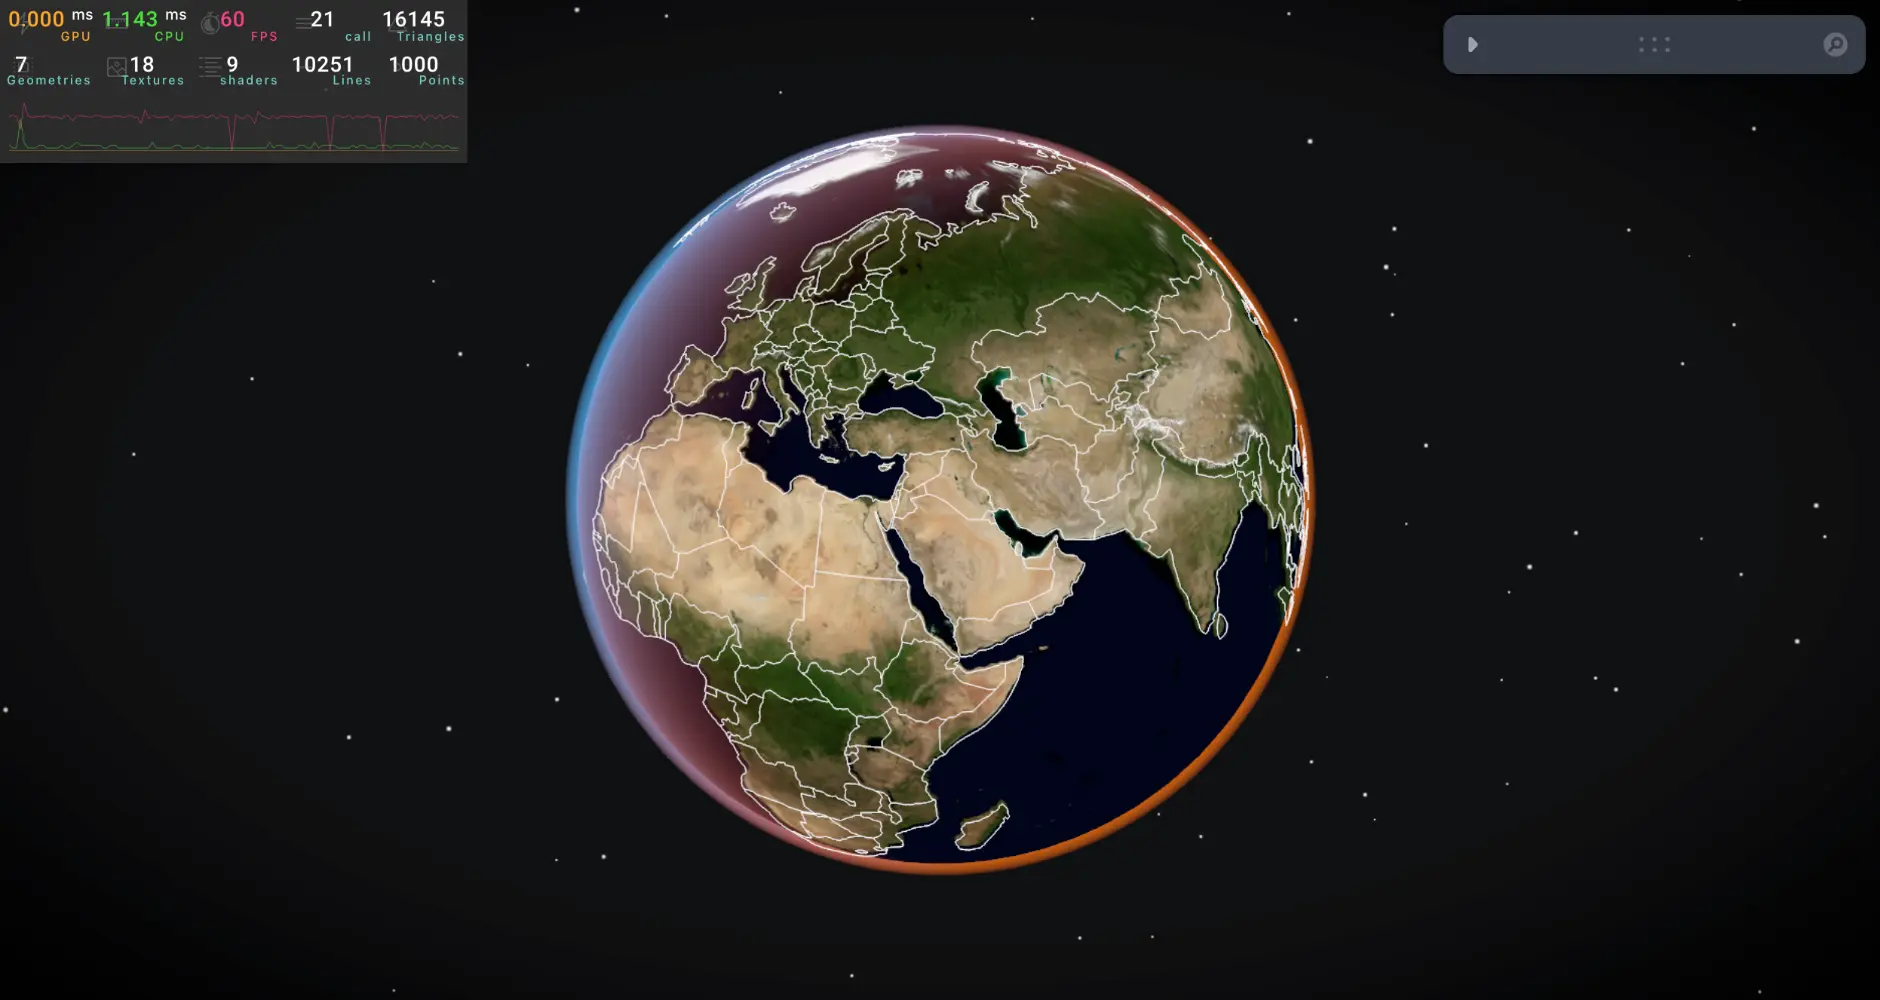
Our final result should look like this :
As in every project, we want the core mechanics work before we make it look better, but as Earth is a big part of our experience, let’s implement in now.
We will actually create 2 atmospheres on our earth to make it look better, this solution is inspired by Three.JS journey.
- The first layer will be on our Sphere
- The second layer will be on external Sphere sligthly bigger than ours and we will render only the outer part.
Earth Texture & Material
If you are not familiar with those, don’t worry - in short terms, a texture is an image we attach to our meshes while Material is the color and how to absorb lights,shadows, etc.
We will use Nasa earth texture combined with our own Shader Material.
First let’s import Drei helpers to use those :
import { shaderMaterial, useTexture } from "@react-three/drei"
We’ll start with the texture as it straight forward to load :
const Earth: React.FC<earthProps> = ({ addObject }) => {
// ...
const earthDayTexture = useTexture('./nasa_texture.jpg')
earthDayTexture.colorSpace = THREE.SRGBColorSpace // for vivid color alongisde Shader Material
We can apply the texture in our JSX file, but instead we will use our own ShaderMaterial and apply it there.
Shaders
I highly recommend studying some basic GLSL from The books of shaders but it’s not necessary if you just want to follow along.
Let’s create our GLSL file and in order to import it we will need a custom vite plugin.
pnpm i vite-plugin-glsl
and now we can create vertex.glsl and fragment.glsl (inside src/shaders/earth) and import them.
import earthVertexShader from '../../shaders/earth/vertex.glsl'
import earthFragmentShader from '../../shaders/earth/fragment.glsl'
In order to use our own ShaderMaterial we will need to use Drei shaderMaterial helper which will create our material.
// outside Earth functional component
const earthParameters = {
    atmosphereDayColor: '#00aaff',
    atmosphereTwilightColor: '#ff6600'
}
const EarthMaterial = shaderMaterial(
    {
        uDayTexture: null,
        uBordersTexture: null,
        uSunDirection: new THREE.Vector3(0, 0, 1),
        uAtmosphereDayColor: new THREE.Color(earthParameters.atmosphereDayColor),
        uAtmosphereTwilightColor: new THREE.Color(earthParameters.atmosphereTwilightColor),
    },
    earthVertexShader,
    earthFragmentShader

)
extend({ EarthMaterial })
The variables you see in the first object starting with u are called uniforms, in essence they are values we can pass to our shaders directly from JavaScript and we will use them now.
- Vertex file - we put inside the information of how to place the vertices, we won’t change anything and just render them as they should, this is the default way of “not touching anything”
varyings- some information we can get in ourvertex.glsland we want to pass tofragment.glsl, similar to how unifroms work - but unifroms are accessible in both vertex and fragment files. varyings are from vertex to fragment.
// Vertex.glsl
varying vec2 vUv;
varying vec3 vNormal;
varying vec3 vPosition;

void main()
{
    // Position
    vec4 modelPosition = modelMatrix * vec4(position, 1.0);
    gl_Position = projectionMatrix * viewMatrix * modelPosition;

    // Model normal
    vec3 modelNormal = (modelMatrix * vec4(normal, 0.0)).xyz;

    // Varyings
    vUv = uv;
    vNormal = modelNormal;
    vPosition = modelPosition.xyz;
}
Fragment - we will recieve the varyings and uniforms and apply some calculations.
The result would be earth with the applied texture, slight atmosphere on the edges with fresnel effect.
- Inside the Fragment shader we could also play with our texture color - like making it more vivid, but we will use Post-Processing later on to achieve global results and not only on our sphere.
varying vec2 vUv;
varying vec3 vNormal;
varying vec3 vPosition;

uniform sampler2D uDayTexture;
uniform vec3 uSunDirection;
uniform vec3 uAtmosphereDayColor;
uniform vec3 uAtmosphereTwilightColor;


void main()
{
    vec3 viewDirection = normalize(vPosition - cameraPosition);
    vec3 normal = normalize(vNormal);
    vec3 color = vec3(0.0, 0.0, 1.0);
    // Sun orientation
    float sunOrientation = dot(uSunDirection,normal);

    // base color texture
    vec3 dayColor = texture(uDayTexture, vUv).rgb;
     color = dayColor;

    // Atmosphere
    float atmosphereDayMix = smoothstep(-0.5,1.0,sunOrientation);
    vec3 atmosphereColor = mix(uAtmosphereTwilightColor,uAtmosphereDayColor,atmosphereDayMix);

    // Fresnel - towards camrea 1 and perpendicular 0 and mix between them
    float fresnel = dot(viewDirection,normal) + 1.0;
    fresnel = pow(fresnel,2.0);
    color = mix(color,atmosphereColor,fresnel * atmosphereDayMix);

    // Final color
    gl_FragColor = vec4(color, 1.0);
    #include <tonemapping_fragment>
    #include <colorspace_fragment>
}
now we are done with our Earth - let’s create another Sphere in a different component called Atmosphere.tsx
Atmosphere Sphere
As I said earlier - this sphere will be original radius * 1.03 (small increase) so it will be slightly bigger than our Earth.
Very similarly to our earth - we will create a custom shader material with It’s own fragment and vertex shaders files.
const AtmosphereMaterial = shaderMaterial(
    {
        uAtmosphereDayColor: new THREE.Color(earthParameters.atmosphereDayColor),
        uAtmosphereTwilightColor: new THREE.Color(earthParameters.atmosphereTwilightColor),

    },
    vertexShader,
    fragmentShader,

)
extend({ AtmosphereMaterial })
const Atmosphere = () => {
    const radius = useGameManagerStore(state => state.radius)
    return (
        <mesh>
            <sphereGeometry args={[radius * 1.03, 64, 64]} />
            <atmosphereMaterial
                side={THREE.BackSide}
                transparent
                blending={THREE.AdditiveBlending}
                depthWrite={false}
            />
        </mesh>
    )
}
export default Atmosphere
The vertex glsl file is basically the same, but the Fragment shader will be unique :
- Basically we create an atmosphere based on the camera direction and sun direction, because our Earth is fixed we will put sun direction from the default camera view as we passed in the uniforms above.
varying vec3 vNormal;
varying vec3 vPosition;
uniform vec3 uAtmosphereDayColor;
uniform vec3 uAtmosphereTwilightColor;

void main()
{
    vec3 viewDirection = normalize(vPosition - cameraPosition);
    vec3 normal = normalize(vNormal);
    vec3 color = vec3(0.0, 0.0, 0.0);
    vec3 uSunDirection = vec3(0.0,0.0,1.0);

    // Sun orientation
    float sunOrientation = dot(uSunDirection,normal);

    // Atmosphere
    float atmosphereDayMix = smoothstep(-0.5,1.0,sunOrientation);
    vec3 atmosphereColor = mix(uAtmosphereTwilightColor,uAtmosphereDayColor,atmosphereDayMix);
    color += atmosphereColor;

    // Alpha
    float edgeAlpha = dot(viewDirection , normal);
    edgeAlpha = smoothstep(0.0, 0.5 , edgeAlpha);

    // float dayAlpha = smoothstep(-0.5,0.0,sunOrientation);
    // float alpha = edgeAlpha * dayAlpha; // fade in day and dissappear at night
    float alpha = edgeAlpha;


    // Final color
    gl_FragColor = vec4(color , alpha );
    #include <tonemapping_fragment>
    #include <colorspace_fragment>
}
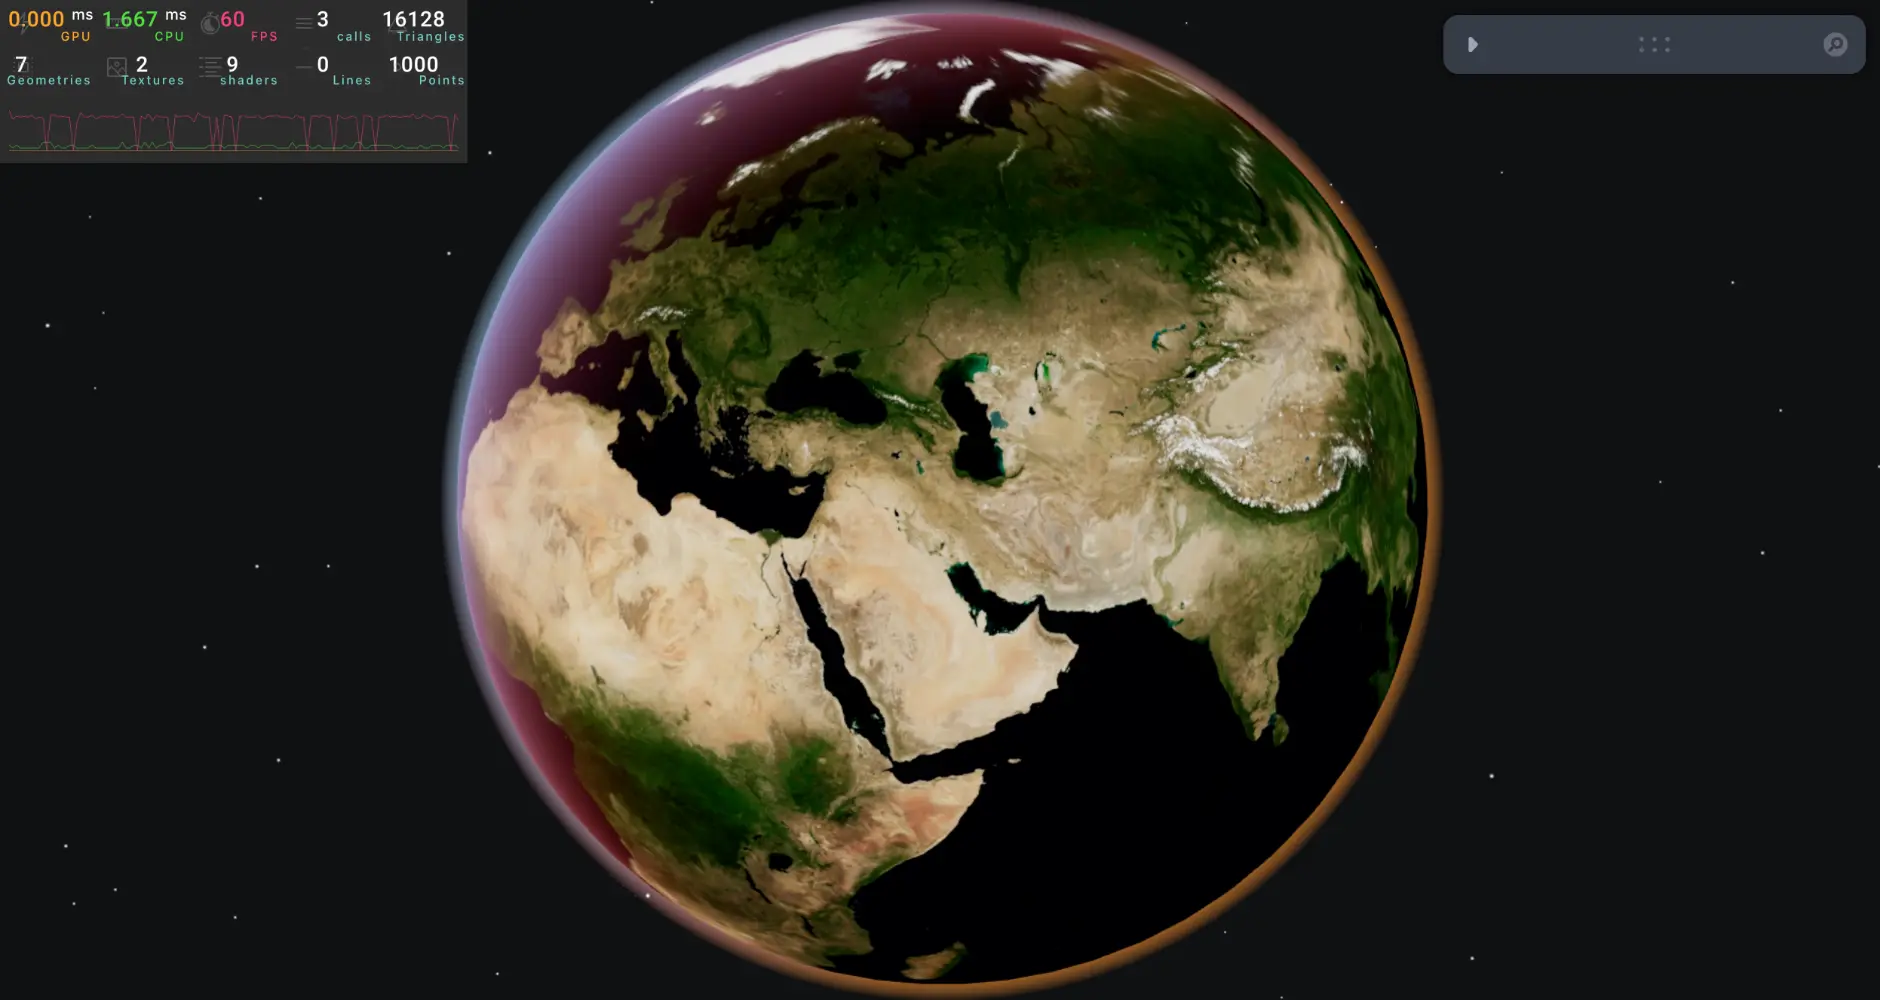
The final result (without post-processing) should look like this :
Post Processing
I won’t dive too much into it beside the implementation - but basically on each render, we will apply custom filters called passes, so each pass will take a snapshot , apply it’s own filter and pass on to the next filters.
We will only use 3 passes as it really impact performance : Bloom, Tone Mapping , Vingette.
- Bloom - simulates the way bright areas in a scene "bleed" or glow, creating a halo or glow effect around light sources and bright objects.
- Tone Mapping - convert high dynamic range (HDR) colors (which can exceed the displayable range of a monitor) into low dynamic range (LDR) colors suitable for display on standard screens.
- Vingette - darkens or lightens the edges and corners of the image, drawing attention toward the center.
Let’s create our post processing component with some Debug UI to control it and use some good looking values.
import { EffectComposer, ToneMapping, Bloom, Vignette, } from '@react-three/postprocessing'
import { useControls } from 'leva'
import { BlendFunction, ToneMappingMode } from 'postprocessing'
const PostProcessingComponent = () => {
    const { enabled, bloom, tone, vingette } = useControls('Post-Processing',
        {
            enabled: true,
            bloom: true, tone: { options: ToneMappingMode },
            vingette: true
        },
        { collapsed: true })


    return enabled ? (
        <EffectComposer enabled={enabled} >
            {bloom ? <Bloom luminanceThreshold={1.0} intensity={1.5} /> : <></>}
            <ToneMapping mode={tone} />
            {vingette ? <Vignette
                offset={0.5} // vignette offset
                darkness={0.5} // vignette darkness
                eskil={false} // Eskil's vignette technique
                blendFunction={BlendFunction.NORMAL} // blend mode
            /> : <></>}


        </EffectComposer>
    ) : null
}
export default PostProcessingComponent
Bonus 🎊
now we already have a good looking earth ! We can make it even better with seperated countries lines.
Basically they are another layer on top of our sphere (similar to the Atmosphere) but they are not a mesh, but a colleciton of Lines - to implement it you will need GeoJSON file and to apply them in Drei, for more information you can look at the source code. after implementing it you will have the result as the image in the beginning of the section !